


A lot of people have gotten a hold of me asking me how I managed to have a clean engine bay. Many have also requested a write up on how to achieve this so without further ado, here it is!
First off, the reason I have the engine bay I have now is flat-out due to the fact that I am lazy. By lazy I mean I HATE removing a bunch of crap just to get to the part I am trying to work on.
For example, working on the alternator (such as replacing it) is so much easier without the power steering pump off. Well, I always have a clear shot at my alternator because I tossed the power steering pump, along with all the other power steering components, a long time ago. The less junk in my engine bay, the easier it is to work on. And I like to work on my car a lot so this saves me an ungodly amount of time.
Not only does it make the engine more mechanically friendly, it looks sexy! Now here is where the fun begins.
This is what my engine bay looked like the very first day I bought it- FULL!

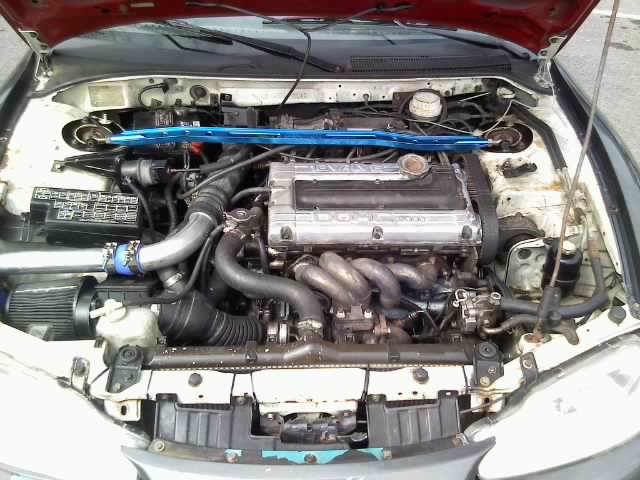
And this is where I am at now.
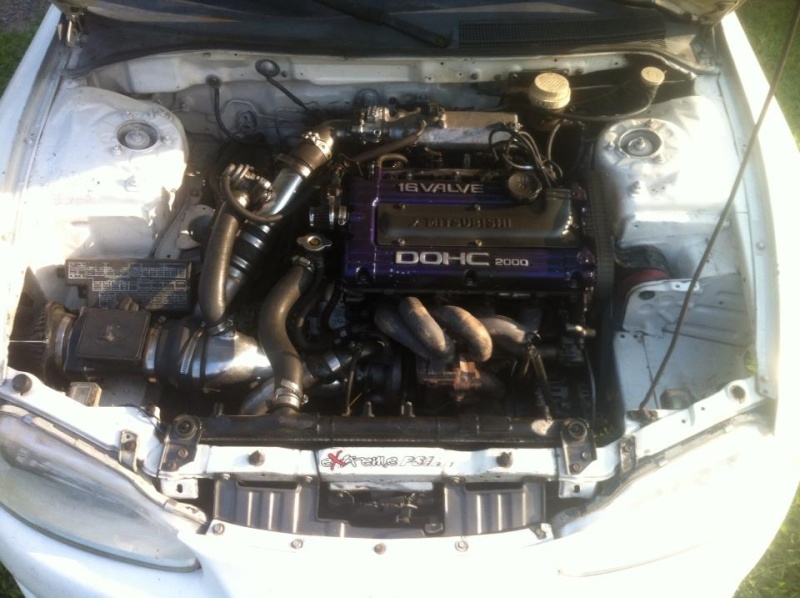
Before I get into the step by step instructions, I want you to notice a few things between these two pictures. First, look at all the wiring shown in the first image. Wires everywhere! Next, take notice to all the parts that are removed. And lastly, notice that I don't have a high dollar engine bay. I don't have all of them high dollar parts. No SMIM, no huge turbo, still running a 2G MAF, no added catch can setups or AFPR. You can absolutely have a beautiful engine bay with the stuff you have in your car right now!
Alright, now for the instructions. I will try to put these in order. I didn't use any particular order, I just did things over the course of about a year.
Ditching the Extra's
The first thing I did was start removing all the unnecessary parts. Although some of these parts may affect your idle, start up, etc., they do not cause the car not to run or perform any worse. Below is a list of things you can remove:
So, that was a pretty long this. That is a LOT of stuff you can remove/relocate. Not only are you getting rid of things and making room, you are shedding precious weight. I would imagine removing all of the above would shave off a noticeable amount of weight.
Here are a few more things you can do:
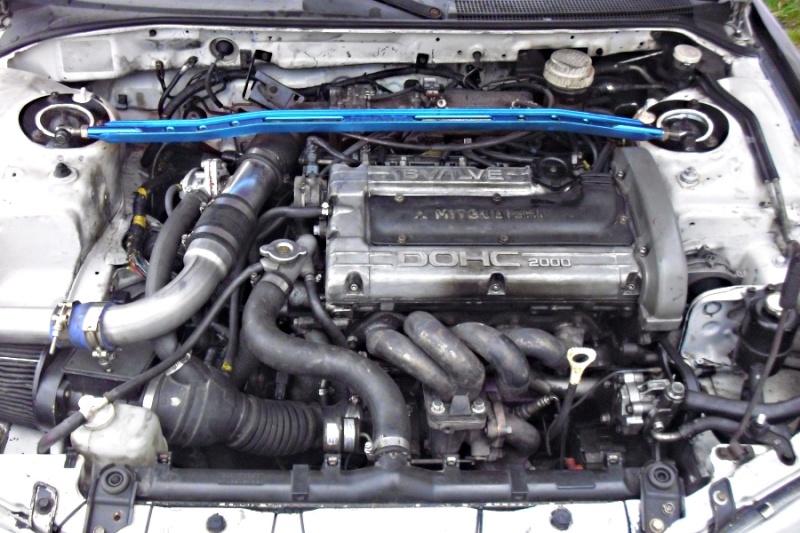
To complete this write up, I will add pictures of my progress along the way. I hope this was helpful to you!


First off, the reason I have the engine bay I have now is flat-out due to the fact that I am lazy. By lazy I mean I HATE removing a bunch of crap just to get to the part I am trying to work on.
For example, working on the alternator (such as replacing it) is so much easier without the power steering pump off. Well, I always have a clear shot at my alternator because I tossed the power steering pump, along with all the other power steering components, a long time ago. The less junk in my engine bay, the easier it is to work on. And I like to work on my car a lot so this saves me an ungodly amount of time.
Not only does it make the engine more mechanically friendly, it looks sexy! Now here is where the fun begins.
This is what my engine bay looked like the very first day I bought it- FULL!
And this is where I am at now.
Before I get into the step by step instructions, I want you to notice a few things between these two pictures. First, look at all the wiring shown in the first image. Wires everywhere! Next, take notice to all the parts that are removed. And lastly, notice that I don't have a high dollar engine bay. I don't have all of them high dollar parts. No SMIM, no huge turbo, still running a 2G MAF, no added catch can setups or AFPR. You can absolutely have a beautiful engine bay with the stuff you have in your car right now!
Alright, now for the instructions. I will try to put these in order. I didn't use any particular order, I just did things over the course of about a year.
Ditching the Extra's
The first thing I did was start removing all the unnecessary parts. Although some of these parts may affect your idle, start up, etc., they do not cause the car not to run or perform any worse. Below is a list of things you can remove:
- Air Conditioning- Remove the compressor, condenser, bracket that attaches the compressor to the block, fan, and all lines.
- Cruise Control- Swapping out the cruise control cable with a non-cruise cable allows you to eliminate all the cruise control parts.
- Delete Emissions- Remove all the vacuum lines and cap off the ports on the throttle body. Remove the charcoal canister beneath the battery. Remove the EGR Valve and install an EGR block-off plate.
- FIAV Delete- Deleting your FIAV helps a little bit too. You get to remove the FIAV and also get to remove the extra lines. This requires a block-off plate. Do some reading up on this before trying it. This generally involves removing your IAC in the process and could cause idle issues.
- Solenoids on the Firewall- There is a bracket located on the driver side of the firewall near your brake fluid reservoir that consist of three solenoids (purge control solenoid valve, fuel pressure solenoid, EGR valve solenoid) in which can be removed. Removing the FPS COULD result in hard starting in cold conditions. I have yet to have this issue.
- Power Steering- Remove the power steering pump, pulley, reservoir, and all lines. Once you remove the lines, run a short hose from one nipple to the other on the steering rack (loop lines).
- Wire Tuck- Wire tucking is a wide-spread topic that deserves a thread for itself as there are many variations of wire tucks. A quick and feasible way to wire tuck is to pull off all of your plugs and pull the harness over the passenger side fender. Clean up the harness (apply tape where it is needed, clean the wires, wrap wires with shrink, loom, or flex braid if you would like). Run the wires that run along the fuel rail, inside the intake manifold so they aren't visible. One by one, run each fuel injector plug to each injector while tucking it under the fuel rail. It is kind of hard to describe, but just run all the wires so that they are hidden. Label all of your plugs before pulling them off.
- Battery Relocation- You have two options. The easiest is to remove your battery tray and battery mount and drop your battery down onto your sub frame. This is what I did. Or, you could spend the extra money and relocate your battery to your hatch (or anywhere for that matter), just do some reading up on it before attempting this.
- Firewall- There are two things you can do with your fire wall.
Your firewall has insulation to reduce sounds from inside the cock pit. Removing this insulation, will improve the look of the engine bay. Most of the time, you are able to remove it all by pulling/ripping it out. You may have issues when you get to the brake booster. Most of us just trim around the brake booster as best as we can. Removing things such as the injector resistor pack, defogger relay, and noise condenser will make it easier to remove. The other thing you can do is remove as much off your fire wall as you can with the engine in the car and relocate it lower on the firewall so it isn't visible. It is obviously significantly easier to do this when the engine is not in the car. I had my engine out enough times to have plenty of opportunity to really focus on the firewall. - Remove Anti-Lock Brake System- If your car is equipped with ABS, you know how much room the ABS takes up. Removing the ABS system requires new front brake lines and a non-ABS proportioning valve. You can easily make your own lines are purchase pre-bent lines for a non-ABS car.
- Alternator Relocation- I have not done this, nor do I plan to, but you can relocate your alternator to your AC compressor location. Jay Racing makes a bracket to do this. I do not plan to do this because the alternator is easy to get to up front in the stock location. It can be a PITA replacing your alternator if it was relocated.
So, that was a pretty long this. That is a LOT of stuff you can remove/relocate. Not only are you getting rid of things and making room, you are shedding precious weight. I would imagine removing all of the above would shave off a noticeable amount of weight.
Here are a few more things you can do:
- Cleaning- Cleaning various parts will go a very long way. A nice pressure wash or even using the local car wash to spray everything down will do wonders. Just make sure you cover things in plastic bags like the alternator, CAS, coil pack, air filter, etc. before spraying to prevent damage to them.
- Remove ANY part, spray with Purple Power degreaser, rinse, spray, repeat until the part is clean. From there, you could sand and paint the part. - Painting the Engine Bay- I have painted my engine bay with the engine in the car. I did so by removing as much from the firewall, strut towers, and front as I could. Then, I cover the engine with large trash bags, taped a few things off, and sprayed the bay. This made a huge difference with my engine bay and is what really started making things look nice. If you ever have to pull the engine, I would go ahead and prep, wash, sand, and paint the engine bay then too.
- Painting the Valve Cover- Out of all of the parts you could paint, the part that plays the biggest role in a nice looking engine bay is the valve cover. It is the very first thing someone sees when looking at your motor. You can paint it yourself or send it out to have powdercoated.
- Valve Cover to Intake Pipe Hose- Remove the hose running from the valve cover to your intake pipe and install a small filter on the valve cover. Then cap the nipple on the intake pipe. This will eliminate the hose and will also provide a slightly cleaner intake system.
To complete this write up, I will add pictures of my progress along the way. I hope this was helpful to you!


» Project Onyx
» Hey Guys
» WOT Tuning Basics
» new to the forum/me member on fb
» DSM beginner
» 4G37 Timing Belt Install Gone Wrong
» '93 7 Bolt 4G63T
» My DSM History