Tools Needed:
- 3/8” Ratchet
- Ratchet extensions (3” or 6”)
- 12mm Socket (3/8” drive)
- 10mm wrench
- Needle nose pliers
- Flat-head screwdriver
- Several rags or hand towels
Step 1: Disconnecting Your Battery
Any time you are handling the fuel system, you should disconnect your battery. Doing so will prevent any sparking which could lead to a hazardous fire.
Step 2: Relieving Your Fuel Pressure
Relieving fuel pressure from the fuel system is a great idea. Doing so will minimize the amount of fuel that will leak when removing your fuel rail. There are several ways to do this. The easiest I found on my 1G Talon TSi AWD is by disconnecting your fuel pump. On the 1G and 2G AWD DSM’s, you are able to access the fuel pump from inside the hatch. Just simply unplug the fuel pump. On FWD’s, you will have to do this from underneath the vehicle. Once the fuel pump is unplugged, start the car and it will stall after a few seconds. This will ensure there is no fuel in the lines. To find out how to relieve the fuel system on your car, do a search for more information.
Step 3: Unplugging the Fuel Injector Clips
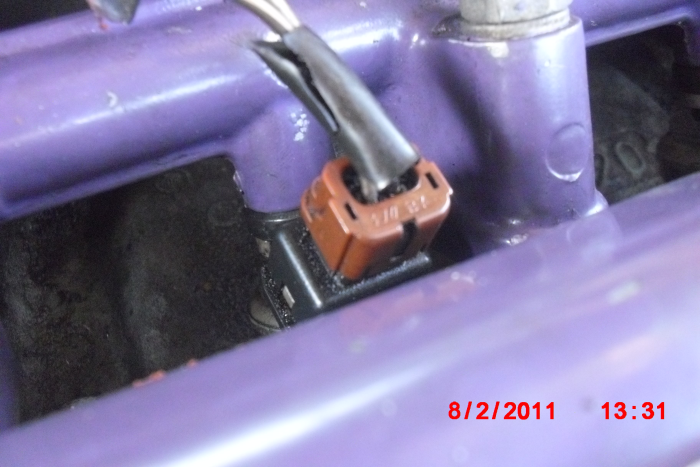
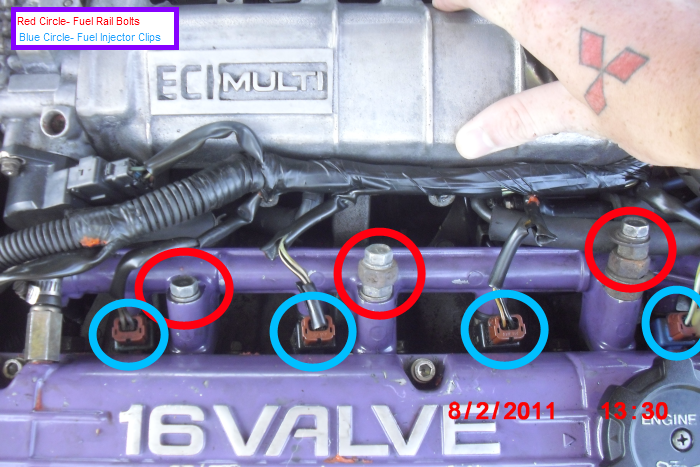
The fuel injector clips should have a metal clip that looks like part of a paper clip. These are very fragile and break over time. If yours are not broke and still function properly, be very careful when removing them. There are a few different ways to remove the clip. The easiest method I have found is by simply using a flat-head screwdriver.

Step 4: Removing Vacuum Lines
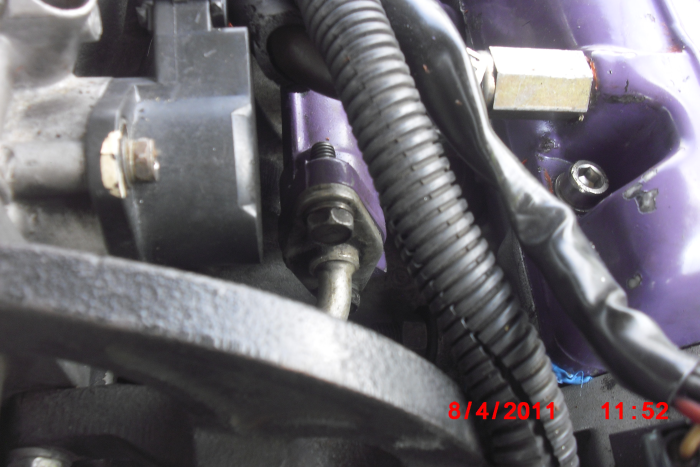
Next, you will need to remove any vacuum lines connected to the fuel rail or in your way. At a minimum, you will need to remove the vacuum line on the driver side end of the fuel rail and the vacuum line that goes to the intake manifold. You should have small hose clamps on these vacuum lines. Use your needle nose pliers to take the clamps off.
Step 5: Removing the Fuel Rail Fittings
Mounted on each end of the fuel rail are fuel rail fittings which need to be removed. Each fuel rail fitting has (2) 10mm bolts. Remove these bolts using either a 10mm wrench or a 10mm socket on a ¼” drive ratchet. Depending on whether or not you relieved the fuel pressure from the fuel system as stated in step 2, there may be fuel that will leak out of the fuel rail fittings when separating them from the fuel rail. Just in case, have rags in standby.


Step 6: Removing the Fuel Rail
You are now ready to remove the fuel rail. On the top of the fuel rail are (3) 12mm bolts. These bolts not only hold the fuel rail to the cylinder head, but support the cruise control cable (if equipped). Once all (3) of these bolts are removed, carefully lift the fuel rail up out. Make sure you do not damage the fuel injectors and that the injectors do not fall out of the fuel rail.

Installation is reverse of removal.
NOTE: Any time you are taking the fuel rail out of the car, you are going to need to replace the injector o-rings. Not doing so may prevent a huge leak and your car will run extremely poor. This should never be overlooked. This would also be a good time to replace the fuel injector insulators and fuel rail absorbers. The insulators go into the tip of the cylinder head. The absorbers are the big plastic/rubber pieces that the fuel rail rests on.
- 3/8” Ratchet
- Ratchet extensions (3” or 6”)
- 12mm Socket (3/8” drive)
- 10mm wrench
- Needle nose pliers
- Flat-head screwdriver
- Several rags or hand towels
Step 1: Disconnecting Your Battery
Any time you are handling the fuel system, you should disconnect your battery. Doing so will prevent any sparking which could lead to a hazardous fire.
Step 2: Relieving Your Fuel Pressure
Relieving fuel pressure from the fuel system is a great idea. Doing so will minimize the amount of fuel that will leak when removing your fuel rail. There are several ways to do this. The easiest I found on my 1G Talon TSi AWD is by disconnecting your fuel pump. On the 1G and 2G AWD DSM’s, you are able to access the fuel pump from inside the hatch. Just simply unplug the fuel pump. On FWD’s, you will have to do this from underneath the vehicle. Once the fuel pump is unplugged, start the car and it will stall after a few seconds. This will ensure there is no fuel in the lines. To find out how to relieve the fuel system on your car, do a search for more information.
Step 3: Unplugging the Fuel Injector Clips
The fuel injector clips should have a metal clip that looks like part of a paper clip. These are very fragile and break over time. If yours are not broke and still function properly, be very careful when removing them. There are a few different ways to remove the clip. The easiest method I have found is by simply using a flat-head screwdriver.

Step 4: Removing Vacuum Lines
Next, you will need to remove any vacuum lines connected to the fuel rail or in your way. At a minimum, you will need to remove the vacuum line on the driver side end of the fuel rail and the vacuum line that goes to the intake manifold. You should have small hose clamps on these vacuum lines. Use your needle nose pliers to take the clamps off.
Step 5: Removing the Fuel Rail Fittings
Mounted on each end of the fuel rail are fuel rail fittings which need to be removed. Each fuel rail fitting has (2) 10mm bolts. Remove these bolts using either a 10mm wrench or a 10mm socket on a ¼” drive ratchet. Depending on whether or not you relieved the fuel pressure from the fuel system as stated in step 2, there may be fuel that will leak out of the fuel rail fittings when separating them from the fuel rail. Just in case, have rags in standby.


Step 6: Removing the Fuel Rail
You are now ready to remove the fuel rail. On the top of the fuel rail are (3) 12mm bolts. These bolts not only hold the fuel rail to the cylinder head, but support the cruise control cable (if equipped). Once all (3) of these bolts are removed, carefully lift the fuel rail up out. Make sure you do not damage the fuel injectors and that the injectors do not fall out of the fuel rail.

Installation is reverse of removal.
NOTE: Any time you are taking the fuel rail out of the car, you are going to need to replace the injector o-rings. Not doing so may prevent a huge leak and your car will run extremely poor. This should never be overlooked. This would also be a good time to replace the fuel injector insulators and fuel rail absorbers. The insulators go into the tip of the cylinder head. The absorbers are the big plastic/rubber pieces that the fuel rail rests on.


» Project Onyx
» Hey Guys
» WOT Tuning Basics
» new to the forum/me member on fb
» DSM beginner
» 4G37 Timing Belt Install Gone Wrong
» '93 7 Bolt 4G63T
» My DSM History