


This is a write up on how to change your spark plugs and spark plug wires on a 4G63 engine. This is extremely easy. I personally, change my spark plugs every oil change (3,000 miles) and I change my plug wires every other oil change (6,000 miles).
At a minimum, you should change your plugs 3 times a year and change your plug wires 2 times a year.
Ok, here we go.
Parts needed:
Spark Plug Wires (Set of 4)
1G 4G63 http://www.extremepsi.com/store/product.php?productid=17644&cat=0&page=1
2G 4G63 http://www.extremepsi.com/store/product.php?productid=17645&cat=0&page=1
Spark Plugs (Set of 4)
90-99 4G63 http://www.extremepsi.com/store/product.php?productid=19240&cat=0&page=1
Anti-seize grease
Di-electric grease
You can also find these spark plugs and wires at any parts store. For the NGK spark plugs, get BRP6ES plugs.
Tools needed:
13/16 Spark Plug Socket 3/8 drive
6" 3/8 drive Extension
3/8 drive Ratchet
Spark Plug Gapper
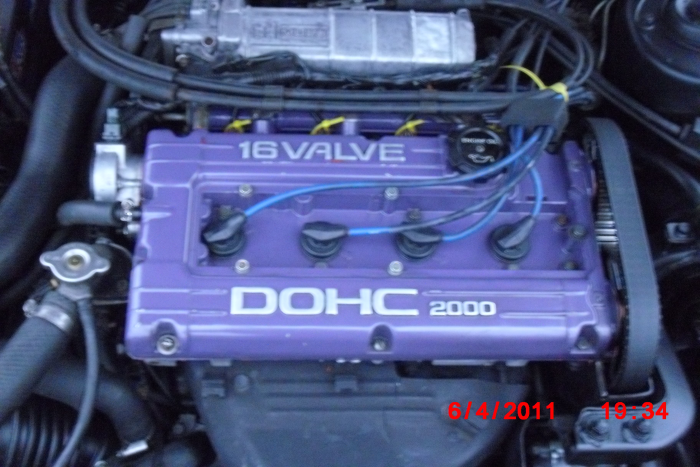
The picture below is the factory layout of the spark plug wires on the 4G63.
Step 1: Remove Spark Plug Cover
Before you can get to the spark plugs and spark plug wires, you will need to remove the spark plug cover (if you have one). I believe there is ( 10mm bolts. You can either remove them with a 10mm socket or with a Phillips screwdriver.
Step 2: Remove Spark Plug Wires
First, unplug the spark plug wires from the spark plugs/head. Leave the other end of the plug wires that plug into the ignition coil. Simply pull the plug wires off of the spark plug in the cylinder head.
Step 3: Remove Spark Plugs
Next, you are ready to remove the spark plugs from the cylinder head. You now will need to use your 13/16 spark plug socket with extension and ratchet.
Step 4: Gapping your new Spark Plugs
If you do not have a spark plug gapping tool, you can find them for very cheap. You need to gap each new spark plug anywhere from .028 to .032 of an inch.
Step 5: Applying Anti-seize
To apply the anti-seize grease, simply put some on the threads of the spark plugs that screw into the cylinder head.
Step 6: Applying the Di-Electric Grease
To apply the di-electric grease, put some onto the side of the spark plug that the wire plugs into (opposite side of anti-seize is applied to).
Step 7: Installing your new Spark Plugs
Now you are ready to install the new spark plugs. It is recommended that you put the spark plug in your socket and carefully guide the plug down the cylinder head. You a small piece of paper towel inside your socket and then put the spark plug in the socket which would then be wrapped by the paper towel. This will prevent your spark plug from falling out thus making it easier to guide the spark plug into the cylinder head. You could also avoid all the hassle and just drop the plug carefully into the cylinder head. Doing this COULD mess up your spark plug gap (in most cases it won't). Once your spark plugs are in the cylinder head, you can now torque them in. DO NOT OVER-TIGHTEN THEM. Doing so could cause you to strip the threads and cause many problems and you may need a new cylinder head. They spark plugs just need to be snug using the ratchet.
Step 8- Installing Your New Spark Plug Wires
Each new NGK spark plug wire will be labelled with a number 1 through 4. In the diagram below, you will see the firing orders. The spark plug labelled as number 1 will need to plug to the number 1 cylinder which is the cylinder on the drivers side end of the vehicle. From left to right (if standing in front of your DSM) the cylinders are: 4-3-2-1. The other end pf the number 1 spark plug wire will need to be connected to the number 1 coil port. From left to right, the coil is to the following cylinders: 1-4-3-2. Please use this diagram.
Step 9- Check Your Work
Now that you are finished, recheck your work. Double check to make sure each plug wire is installed to the correct cylinder and ignition coil port. Once you are confident you installed everything properly, you can then start your DSM. Once you start it, make sure it sounds like it is firing properly, doesn't missfire, etc. If everything is still good, you can then take your DSM for a test drive. Though in most cases you will not see any difference in power, it is possible depending on how rough in shape your old spark plugs and spark plug wires were in as well as the brand of your old spark plugs and wires.
At a minimum, you should change your plugs 3 times a year and change your plug wires 2 times a year.
Ok, here we go.
Parts needed:
Spark Plug Wires (Set of 4)
1G 4G63 http://www.extremepsi.com/store/product.php?productid=17644&cat=0&page=1
2G 4G63 http://www.extremepsi.com/store/product.php?productid=17645&cat=0&page=1
Spark Plugs (Set of 4)
90-99 4G63 http://www.extremepsi.com/store/product.php?productid=19240&cat=0&page=1
Anti-seize grease
Di-electric grease
You can also find these spark plugs and wires at any parts store. For the NGK spark plugs, get BRP6ES plugs.
Tools needed:
13/16 Spark Plug Socket 3/8 drive
6" 3/8 drive Extension
3/8 drive Ratchet
Spark Plug Gapper
The picture below is the factory layout of the spark plug wires on the 4G63.
Step 1: Remove Spark Plug Cover
Before you can get to the spark plugs and spark plug wires, you will need to remove the spark plug cover (if you have one). I believe there is (
Step 2: Remove Spark Plug Wires
First, unplug the spark plug wires from the spark plugs/head. Leave the other end of the plug wires that plug into the ignition coil. Simply pull the plug wires off of the spark plug in the cylinder head.
Step 3: Remove Spark Plugs
Next, you are ready to remove the spark plugs from the cylinder head. You now will need to use your 13/16 spark plug socket with extension and ratchet.
Step 4: Gapping your new Spark Plugs
If you do not have a spark plug gapping tool, you can find them for very cheap. You need to gap each new spark plug anywhere from .028 to .032 of an inch.
Step 5: Applying Anti-seize
To apply the anti-seize grease, simply put some on the threads of the spark plugs that screw into the cylinder head.
Step 6: Applying the Di-Electric Grease
To apply the di-electric grease, put some onto the side of the spark plug that the wire plugs into (opposite side of anti-seize is applied to).
Step 7: Installing your new Spark Plugs
Now you are ready to install the new spark plugs. It is recommended that you put the spark plug in your socket and carefully guide the plug down the cylinder head. You a small piece of paper towel inside your socket and then put the spark plug in the socket which would then be wrapped by the paper towel. This will prevent your spark plug from falling out thus making it easier to guide the spark plug into the cylinder head. You could also avoid all the hassle and just drop the plug carefully into the cylinder head. Doing this COULD mess up your spark plug gap (in most cases it won't). Once your spark plugs are in the cylinder head, you can now torque them in. DO NOT OVER-TIGHTEN THEM. Doing so could cause you to strip the threads and cause many problems and you may need a new cylinder head. They spark plugs just need to be snug using the ratchet.
Step 8- Installing Your New Spark Plug Wires
Each new NGK spark plug wire will be labelled with a number 1 through 4. In the diagram below, you will see the firing orders. The spark plug labelled as number 1 will need to plug to the number 1 cylinder which is the cylinder on the drivers side end of the vehicle. From left to right (if standing in front of your DSM) the cylinders are: 4-3-2-1. The other end pf the number 1 spark plug wire will need to be connected to the number 1 coil port. From left to right, the coil is to the following cylinders: 1-4-3-2. Please use this diagram.
Step 9- Check Your Work
Now that you are finished, recheck your work. Double check to make sure each plug wire is installed to the correct cylinder and ignition coil port. Once you are confident you installed everything properly, you can then start your DSM. Once you start it, make sure it sounds like it is firing properly, doesn't missfire, etc. If everything is still good, you can then take your DSM for a test drive. Though in most cases you will not see any difference in power, it is possible depending on how rough in shape your old spark plugs and spark plug wires were in as well as the brand of your old spark plugs and wires.


» Project Onyx
» Hey Guys
» WOT Tuning Basics
» new to the forum/me member on fb
» DSM beginner
» 4G37 Timing Belt Install Gone Wrong
» '93 7 Bolt 4G63T
» My DSM History